LiquidLayer.net

Preview a site with the new host before DNS propagationTransferring a website to a new web hosting provider might be a challenge, since the site ownercannot have a 100% clear picture of how the site will fit into the specifics of the new server before the DNS propagation is complete.

Luckily, there are a few tricks that can help users get a clear idea of how the newly transferred content will load from the new server after the DNS propagation has been completed.

1. Use the temporary host assigned to a hosting account
At signup, users are assigned a fully functioning temporary host, which they can use to preview their site. All they need to do is transfer their site contents to the host’s folder and then see how the site will load from the new location by using its URL.

They can find the host’s URL in the Welcome email and in the Hosted Domains section of the Web Hosting Control Panel.

NOTE: Temporary URLs are not recommended for previewing sites that use a strict URL configuration (including WordPress, PrestaShop, osCommerce, etc. sites), since they may force a URL rewrite that goes back to the original domain name, which may result in a redirection to your previous host, or in the site not displaying at all.

2. Use the local host of a computer
Users can preview their website with their own domain name before the DNS propagation has been completed by using their local computer’s HOSTS file.

With a simple HOSTS file tweak, their computer will resolve the site locally prior to looking up the domain’s DNS records.

Here is how to use your computer’s HOST file on the two common Operating Systems:

Windows OS

1. Find the HOSTS file. It’s usually located here:
– Windows NT/2000/XP/2003/Vista/7 – C:\windows\system32\drivers\etc\hosts
– Windows 95/98/Me – C:\windows\hosts

2. Make sure you make a backup of the file before changing it.

3. Open the file with any text editor. There will be two columns, the first one containing IP addresses (e.g.: 127.0.0.1) and the second one – related hostnames (e.g.: localhost).

4. Add a new line with the IP of the server where your domain is hosted and then add your domain.

For example:

116.0.0.1 localhost
60.45.92.163 example.com
60.45.92.163 www.example.com

5. Save all changes.

6. Now restart any opened browser. When the browser opens again, enter your site’s address – it should load from its new location.

7. If the site does not open, you may have to flush the DNS cache. Go to Start, and then Run, then type “cmd” and hit enter.

Type the following: ipconfig /flushdns

8. Your website should now open without a problem.

Mac OS X

1. Open the Terminal app (it’s located in the Utilities folder in your Applications folder).

2. Create a backup copy of your existing hosts file with the following command:

sudo cp /private/etc/hosts /private/etc/hosts-orig

3. Enter your user password.

4. Now, it’s time to edit the file. Enter the following command:

sudo vi /private/etc/hosts

5. Enter your user password.

6. If you get a permission error, go to your “Help” menu, search for “root” and follow the instructions for “Enabling the root user.” When you are ready, go back to step 2.

7. You will see a file with contents similar to the following:

##
# Host Database
#
# localhost is used to configure the loopback interface
# when the system is booting. Do not change this entry.
##
116.0.0.1 localhost
255.255.255.255 broadcasthost
::1 localhost
fe80::1%lo0 localhost

8. Add your domain and IP address to the bottom of the list. Press “i” to enter the “Insert mode”. When you are done modifying the file, press “Esc” to exit the “Insert mode”. Type “:wq” to save the changes and quit.

For example:

# Host Database
#
# localhost is used to configure the loopback interface
# when the system is booting. Do not change this entry.
##
116.0.0.1 localhost
255.255.255.255 broadcasthost
::1 localhost
fe80::1%lo0 localhost
60.45.92.163 example.com
60.45.92.163 www.example.com

9. You may also need to grant yourself sudo privileges. In your “Help” menu, search for “root” and select the instructions for “Enabling the root user.” Follow these.

10. Now restart any opened browser. When the browser opens again, enter your site’s address – it should load from its new location.

11. If the site does not open, you may have to flush the DNS cache. To do that, type the following in the Terminal:

dscacheutil -flushcache

12. Your website should now open without a problem.

3. Use our site transfer services
If you or your customers consider site transfer as being too much of a challenge, you can make use of our site transfer service, which is included for free with each hosting package.

Our technicians will need authorized access to your hosting account with your previous host so that they could transfer the files over to our platform. They will then test your site on our servers and will make sure it resolves flawlessly from the new location as soon as the DNS propagation has been completed.

All you will need to do on your end is update the domain’s nameservers in your domain management account.

Confirmation of domain transfer requestICANN, the Internet Corporation for Assigned Names and Numbers, has put into circulation a new transfer policy for generic domain names.
From now on, a registrant who initiates a transfer from one registrar to another will receive an email from the present registrar where they will need to confirm their transfer to the new company.

This update to the transfer policy is aimed at further protecting domain owners from unauthorized transfer attempts.

How does the new policy update amplify the existing transfer rules?

So far, every domain transfer initiating registrant has had to authorize the transfer request through a special link supplied by the new registrar (sent via the so-called ‘Initial Authorization for Registrar Transfer’ email, as per ICANN’s transfer policy).

To make sure that no unauthorized transfer request has managed to slip through the authorization email filter, ICANN has introduced another ‘bureaucratic’ procedure to the transfer policy.

According to the new transfer rules, the registrant will also receive an email from the Registrar of Record (i.e. the losing registrar), where they will be prompted to confirm that the transfer request is authorized by the domain owner through a special link – a procedure also known as a ‘Confirmation of Registrar Transfer Request’, as per ICANN’s transfer policy.

Here is how the transfer confirmation form will look like:

Confirm domain transfer

The registrant will be able to confirm the transfer request or reject it if, for some reason, it has not been authorized by them.

NOTE: If a registrant does not take any action with regard to the confirmation emailwithin 3 days, the transfer request will be considered as ‘approved’.

Which domain names will the new transfer policy affect?

ICANN’s transfer policy is in force only for the generic top-level domain names that are overseen by ICANN itself – .COM. .NET, .ORG, .INFO and .BIZ.

As an ICANN-accredited registrar, we are bound by the new policy and have implemented it in our domain management system accordingly.

***

Hopefully, the new transfer policy update will be perceived by registrants more as a protective necessity than a ‘paperwork’ inconvenience and will be able to bring the number of disputed domain transfers to a minimum.

SSL certificates now much cheaperIn tune with the ever-shifting trends on the SSL market, we have moved to a more reasonably priced SSL provider and can now offer you a much more competitive pricing window for both generic and Wildcard SSL certificates.

The certificates are issued by Comodo – Positive SSL, and use 2048-bit RSA keys with 256-bit encryption.

They come with a strong authentication warranty, an authentic site seal and free re-issue & money-back guarantees.

Wildcard SSL certificates now 51% cheaper

Wildcard certificates allow you to easily secure as many sites under a certain domain name as you need, for example: www.my-site-name.com, blog.my-site-name.com, shop.my-site-name.com, etc. Usually, their much higher price is considered justified due to the unlimited number of hosts that they can secure.

However, now that we have lowered the price of Wildcard certificates by more than 50%, you have a great chance of drawing more customers with more competitive price levels.

Because of the significant change to the prices of the Wildcard certificates, we have updated your end prices to the new default retail rates.

TIP: You can update your prices with a click from your Reseller Control Panel -> My Offers -> SSL Certificates (the Wildcard SSL Certificates table).

Generic SSL certificates now 20% cheaper

After the recent major generic SSL certificate price drop, we have now taken another step to let you offer a really competitive security service for your customers’ domains.

The price of a normal SSL certificate offered on your store for a single domain name has fallen by another 20%.

Since the generic certificate price decrease is of a smaller scale, we have preserved the current retail prices of those of you who have updated their pricing so far. To finetune the latter to the competitive trends on the SSL market, you can hurry up and scale down your sale prices from your Reseller Control Panel -> My Offers -> SSL Certificates.

TIP: You can update your prices with a click from your Reseller Control Panel -> My Offers -> SSL Certificates (the SSL Certificates table).

What will be the price of a renewed SSL certificate?

In order for existing SSL users to take advantage of the new lower prices, an SSL from the new provider will be issued upon renewal.

For this reason, the actual SSL renewal will take place several days prior to the expiration of the current SSL certificate.

How does our SSL service compare against the competition?

True to our policy to deliver the most cost-effective service to your customers, we enabled SNI support on our platform the moment it became widely available as a means of installing SSL certificates on shared IPs. This made SSL certificates more affordable for customers.

Most providers, however, do not offer SSL installation on shared IPs yet, due to the lack of SNI support on their servers. This way, customers are still required to tie their SSL certificate to a dedicated IP address, which usually triples the SSL installation price.

Also, some providers even require a fee in order to install your own SSL certificate on their servers.

From the Hepsia Web Hosting Control Panel, your customers can install an SSL, which they have bought from another provider, at no cost. They can do that from the Hosted Domainssection. They need to click on the Edit Host icon and then to select the ‘’Upload an SSL Certificate’’ option:

Upload an SSL certificate

Google Drive Backups in HepsiaOver the last year, we have improved the backup capabilities of our web hosting platform by enabling the option to back up your content to Dropbox and by making your data backups browsable and accessible with a click from the Web Hosting Control Panel.

Now we have added the option to have your data backed up online by means of Google Drive. This option is meant to help Google users (who, as we all know, make up a large percentage of the web users) integrate their sites with their Google account and thus keep all important data in one place.

How will the Google Drive backup option work for users?

Just like with the Dropbox backup option, which has been extensively used by your customers throughout the last year, users will be able to back up their entire site content using their Google Drive accounts. This includes files (text files, images, videos, etc.) and databases (MySQL and PostgreSQL).

NOTE: The Google Drive and the Dropbox backup options will be available on an either-or basis per host, i.e. you can select to back up your data for a certain host using either Dropbox or Google Drive.

How to back up your sites using Google Drive?

In the Web Hosting Control Panel, go to Files and then click on the Remote Backups option:

Google Drive Backup in Hepsia - Remote Backups

Then click on the Add Google Drive Account button in the top right corner:

Google Drive Backups in Hepsia - Database Backups

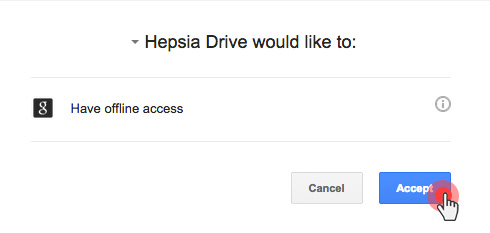
Our Hepsia Backup Application will ask you for permission. Click on the Accept button to go ahead:

Google Drive Backup Hepsia -  Accept Application

Now your hosting account and your Google Drive profile are connected. You’ll also get an email notification from Google to confirm that.

You can back up 3 types of data, which are divided into columns, including hostnames (this means the entire content on your sites apart from your databases), MySQL databases andPgSQL databases:

Google Drive Backup Hepsia -  Domains

Now select the host that you want to make a backup for and then select the Google account that you want to use from the Connected Accounts dropdown menu:

Google Drive Backup Hepsia -  Select Google Account

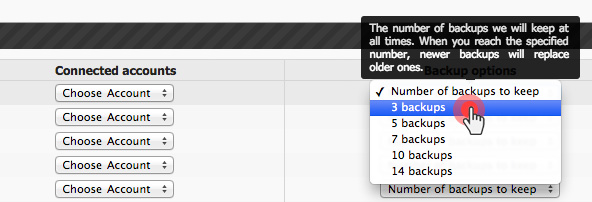
After that, you’ll need to select the period within which the backup will be generated. You can choose between 3 and 14 backups. Our backup script will run every other day, generating a full backup of your files:

Google Drive Backup in Hepsia - Select Period

For instance, if you choose 3 backups, the script will create 3 full backups from the last 6 days (a backup every other day).

The moment you select the backup period, the backup process will be started.

In the root folder of your Google Drive account, you can see the HepsiaBackups folder that has just been created under the Apps folder:

Google Drive Backup in Hepsia -  backup folder


When the hostname backup generation process starts, you’ll see the backups organized in folders (every backup from a given day will be placed in a separate folder).

Google Drive Backup in Hepsia -  backup folders

If you want to make a backup of your MySQL or PgSQL databases as well, you will need to go through the same procedure:

Google Drive backups in Hepsia - Database Backups

NOTE: We will make automatic backups of your websites and databases on our servers, no matter if you use our Google Drive/Dropbox backup service or not.

The Google Drive backup service is available with all Hepsia-based services – shared hosting packages, semi-dedicated servers, Virtual Privateer Servers and dedicated servers.

PHP 5.7 (PHP NG) to become PHP 7PHP is a living language and as such, it undergoesconstant developments, experiments and upgrades. This is why, it is hard to predict how it will unfold within a year or even less.

A vivid example is PHP 6, which was well seen as the new official PHP release. However, it was soon brought to oblivion due to a contradiction among participating developers.

On the other hand, the PHP 5.7 dev version has managed to stand the test of time and is now considered a herald of the brand new PHP 7 series.

What happened to PHP 6?

PHP 6 first appeared in 2005 as a development project, which offered a brand new encoding approach by bringing Unicode into the PHP engine. According to the new approach, UTF-16 had to be used for internal encoding of everything inside the engine.

However, the excessive CPU time and memory entangled in the UTF-16 conversion (almost twice as much as with a UTF-8 string) made PHP 6 too complex and resource-consuming to implement.

Thus, PHP 6 never went out of its dev state and many of its worthy new features like the language-integrated Unicode support, etc. ended up landing in the PHP 5.x series.

Here’s what the PHP community had to say about it:

“PHP 6 was one of the biggest traumas in the php.net history. We have magisterially failed to define a clear roadmap, to find consensus on what it should be like, along with many other issues like small groups fighting one another or hidden meetings or developments.”

Why is PHP 5.7 the new official PHP candidate?

As PHP 6 was slowly assimilated by the PHP 5.x branch, the PHP community got some ‘fresh air’ and a strong push to release a new major release candidate – PHP 5.7, also known as PHPNG.

According to phpng developers, the key benefits of PHP 5.7 revolve around performance and memory utilization.

It has so far shown striking performance improvements over the current stable release PHP 5.6 and is about to become nearly 100% faster than PHP 5.6 when rendering the front page of a stock WordPress installation, for example. All that is achieved with no negative effect on its compatibility.

The secret to this performance supremacy is that nearly 60% of the CPU instructions have been “retired” and replaced by more efficient code.

Before PHP 5.7, the only way to get performance like this was by using a HipHop Virtual Machine, which, however is hard to configure and lacks compatibility.

On account of its amazing practice scores, PHP 5.7 is anticipated to bring a tremendous performance boost to the servers around the world.

If PHP 6 was a trauma, the latter seems to have been cured by the excitement over PHPNG and its forthcoming transition into PHP 7.

Here is an official statement of the PHP community about the production release date:

“With key decisions about both the version number and the engine for PHP 7 behind us, it’s time to define an agreed-upon timeline so that all contributors can align around it. The purpose of this RFC is to define a one-year timeline for the delivery of PHP 7.0, with a projected release date of November 2015.”

How to use PHP 5.7 on our servers?

PHP 5.7 is now supported by most bundled extensions and our developers have updated it to the latest release on our servers.

NOTE: Keep in mind that PHP 5.7 is still in development and is not recommended for use on production websites.

You can enable PHP 5.7 for your projects from the Advanced section of your Web Hosting Control Panel, under PHP Configuration:

PHP NG in the Control Panel


Based on your valuable suggestions, we have made a few noteworthy enhancements to the ticketing system in the Web Hosting Control Panel

The updates, both visual and functional, are aimed at making our communication with you a bit more straightforward and interactive.

Here is a quick overview of the new improvements:

So far, the tickets in the Web Hosting Control Panel have had two basic statuses – Open and Closed.

Now each ticket will also be flagged to show if it has been read by you or not.

Tickets that have received a new response will alert you with an orange flag – ‘New Message’.

Those featuring a response from the technical support team, which has been seen by you will be labelled with a green ‘Received Assistance’ flag:

NOTE: When you read a ticket with a new message, the ticket will automatically obtain a ‘Received Assistance’ status, no matter if you have left any comment or not.

The new message alerts will also be visible in the Inbox notification area inside the Control Panel (the header area):

Additionally, if our technicians open a ticket about a very important situation like exceeded resource limits or service violations,

a special ‘Immediate attention required’ message will pop up when you open your Control Panel:

Another SSL vulnerability – the POODLE bug, has surfaced. Server-side measures taken.

SSL 3.0 POODLE vulnerability -October 16th, 2014

Just a few months after the Heartbleed bug shattered the believed-to-be-secure SSL/TLS encryption layer status quo and put data transfers, emails, instant messages, etc. at risk, a new SSL vulnerability has been brought to light by Google experts.

According to Google researchers, a weakness in the SSL 3.0 protocol could be used to eavesdrop critical data that is transferred over an encrypted connection between web browsers, apps, etc. and servers.

The ‘new’ bug is called POODLE – an acronym for Padding Oracle On Downgraded Legacy Encryption.

The mechanism of the POODLE attack

The newly discovered POODLE exploit poses a great threat to online security, since it affects an old SSL version, which is still widely used by the majority of servers and clients.

It allows hackers to outsmart a web client by telling it that the server does not support the more secure TLS (Transport Layer Security) protocol, so the client is forced to connect via SSL 3.0.

This downgrade maneuver opens the door of abuse and attackers can freely decrypt secure HTTP data and steal the protected information.

Measures taken against POODLE attacks

With the discovery of POODLE, the security specialists at Google instantly recommended measures for dealing with this encryption issue.

First and foremost, the SSL 3.0 protocol needs to be disabled for both participants in the SSL communication – the server and the client, and they need to default to the more secure TLS. This will stop attackers from forcing the communication to go through the exploited SSL 3.0.

Server-side measures:

In response to the Google team’s recommendation, our web hosting servers no longer support SSL 3.0 and older versions of the protocol. Also, our administrators have set the minimum SSL requirement to the provenly secure TLS 1.0.

NOTE: As a result, an Internet Explorer browser whose version is 6.0 or older will not be able to access websites hosted on our servers.

Client-side measures:

As far as web clients are concerned, Google specialists recommend that end users immediately disable SSL 3.0 support in their browsers, if such exists.

In response to the issue, Google plans to remove SSL 3.0 support completely from all its products in the upcoming months. Currently, they even offer a Chromium patch, which disables the SSL 3.0 fallback.

Mozilla has also announced plans to turn off SSL 3.0 in Firefox and it will be disabled by default in Firefox 34, which will be released in November. They also offer code for disabling the protocol, which is now available via Nightly. Also, you can use the SSL Version Control add-on for Firefox.

Upcoming actions against POODLE attacks

To further secure our system against future downgrade attacks, our admins are also planning toimplement TLS_FALLBACK_SCSV (Transport Layer Security Signalling Cipher Suite Value) on all our servers shortly. We’ll keep you posted.


ModSecurity now enabled with all VPSs

ModSecurity on VPSThe ModSecurity Apache module is a great solution for minimizing the number of hack attacks to websites and applications.

It acts as an application-layer firewall and is able to effectively prevent most brute force/ URL forgery attacks and forum spamming attempts targeted at sites.

Some time ago, we enabled the ModSecurity protection layer as a default feature with all shared hosting accounts. Now the highly effective anti-hack firewall is enabled with all VPSs as well.

ModSecurity enabled on all VPSs

As with shared hosting accounts, the ModSecurity firewall is enabled by default on your VPS, so you don’t have to configure anything in order to have your websites protected.

ModSecurity is running in a blocking mode, so it will automatically block all incoming requests that are flagged as insecure according to the commercial rules at http://www.atomicorp.com.

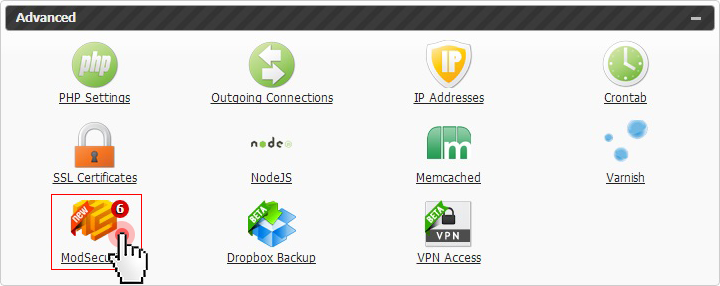
You can access the ModSecurity section in the Hepsia Control Panel from the newly added shortcut on the Control Panel’s home page or from the Advanced drop-down menu:

ModSecurity in the Control Panel

How does ModSecurity exactly work?

Over 70% of all the attacks are now carried out at the web application level and being a web application firewall (WAF) itself, ModSecurity effectively addresses this problem.

Its purpose is to establish an external security layer, which allows for HTTP traffic monitoring and real-time analysis, and it offers a powerful API for implementing the advanced protection needed.

This way, the firewall ensures an enhanced level of security, where the malicious attacks are detected and prevented before they reach the web applications.

ModSecurity against brute force attacks

ModSecurity has proven to be very efficient in preventing “brute force” attacks, i.e. the attempts to guess the username and the password of a web application, using a predefined set of usernames and passwords and combining them randomly.

Thanks to the ModSecurity firewall, if there are more than 15 failed login attempts from an IP address within 3 minutes, the IP address will be blocked from accessing the website for the next 30 minutes.

So far, the ModSecurity plugin has reduced the number of hacked websites on our servers dramatically.

If you have any questions about ModSecurity and about how it will work on your Virtual Private Server, don’t hesitate to contact our support team by opening a ticket from the Web Hosting Control Panel.

Password Setup interface added for new web hosting accounts

Password setup interface for Hepsia Control PanelPassword transmission over email has always been a hot topic for security-sensitive users and this is so for a reason – password smugglers are getting smarter in inventing new ways of stealing private information.
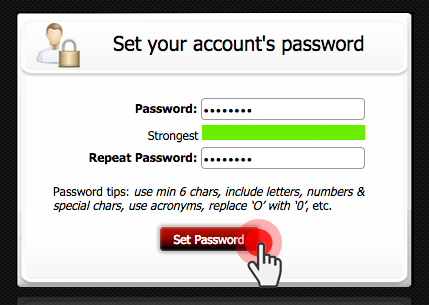
We’ve addressed this issue by moving passwords out of welcome emails and by implementing a password setup interface for first-time customers.

The interface will be applicable to both new hosting account signupsand to situations when users request to reset their passwords.

A Password Setup interface for new customers

From today, welcome emails sent to newly registered users will feature special instructions on how to set up their hosting account passwords on their own:

Password Setup interface - Welcome mail

Through a special link, they will be taken to a secure page where they can set up their web hosting account password:

Password setup interface - login page

After they type their password in the two fields following the password strength tips that we have included in the form, they will be able to log into their hosting accounts immediately.

The password they set through the form will be also be valid for the FTP account, which is created for the user at signup.

A Password Setup interface for resetting passwords

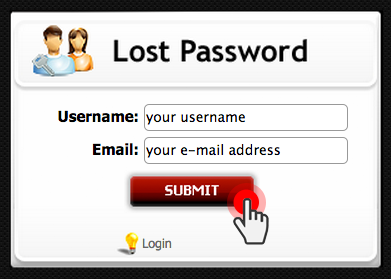
The password setup form can also be used in cases of password changes. When a customer requests to reset their password from the login form of the Web Hosting Control Panel, they will be sent an email notification, which will forward them to the same password setup form:

Password setup interface - reset password

After filling out the form, the user will be instantly logged into the Control Panel with the new password.

NOTE: Since the hosting account password will not be readily available to the user in a written form anymore, users will be recommended to instantly save their passwords in the browser or use a password management tool.

Semi-dedicated servers in the Australian data centerLast week, our admins were busy configuring server packages in our partnering data centers in Europe – semi-dedicated and OpenVZ VPS packages in Finland and in Eastern Europe, as well as semi-dedicated packages in the UK and in the TelePoint data center in Sofia, Bulgaria.
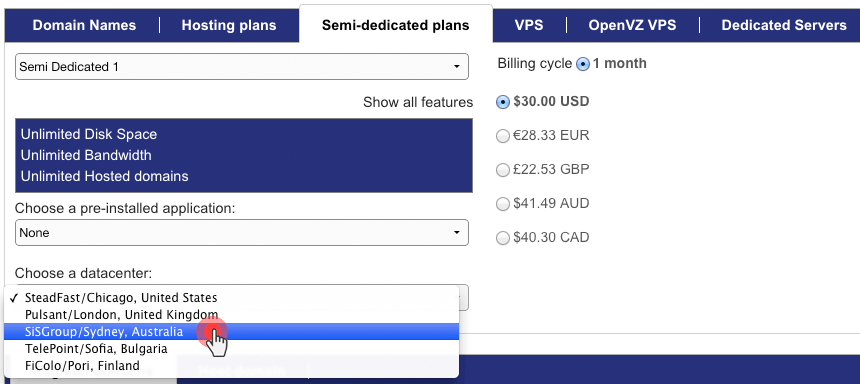
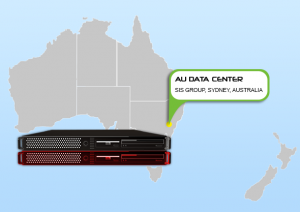
This week, they added semi-dedicated servers to the data center in Australia, so now you will be able to target a new niche on the Australian hosting market.

Target customers from Australia & the region with more advanced needs

With the addition of semi-dedicated servers to the list of services offered in Australia, you can now expand your reach by addressing the needs of more demanding customers.

From today, site owners who run more complex sites, for example – resource-consuming blogs or traffic-hungry e-stores, will be able to seamlessly move to a more powerful web hosting solution with a click of the mouse.

au-data-center-semi-dedicated-servers

Since the semi-dedicated servers are based on the same cloud hosting platform that is implemented on our shared hosting servers, an existing shared hosting customer will be able to quickly upgrade to a semi-dedicated server by opening a ticket from their Web Hosting Control Panel. Our technicians will allocate the new extra resources to the customer’s account in a matter of minutes and let the customer know immediately.

The Australian data center – key highlights

SIS Group – the Australian data center that we are partnering with, is located in the business district of Sydney. It is a perfect hosting choice for customers from Australia, New Zealand, the islands of Oceania and Southeast Asia.

The facility relies on redundant high-speed Internet connections and is well-equipped to handle high volumes of traffic from the area and abroad.

Strict temperature and humidity control equipment, water detection systems, security controls and powerful backup power supplies guarantee the continuous flow of customers’ data.

Here’s an overview of the facility’s main advantages:

  • 24×7 Onsite Security
  • Raised Computer Room Flooring
  • Multiple UPS Systems
  • Backup Diesel Generators
  • Dark Fibre Connectivity
  • Fire Protection
  • Video Surveillance
  • Rack Mount Equipment
  • Desktop Equipment
  • Device Monitoring
  • Load Balancing
  • Tape Rotation and Offsite Storage
  • Online Data Backups
  • Remote Hands